Decoding a Bitcoin Transaction
When I was first getting started with Bitcoin, I experimented with transferring off-exchange to a cold wallet hardware device.
Looking at transactions on a blockchain explorer can be overwhelming.
There’s a lot to digest.
After a lot of research about technical details of Bitcoin transactions including trial and error…everything started to make sense.
Here’s what I learned…
First, identify a transaction you want to dissect and copy the 64-bit Transaction ID (TXID) which is also referred to as the Hash ID or (Transaction Hash).
For example, the TXID for the ($400M) 10,000 BTC Papa John’s pizza transaction is:
cca7507897abc89628f450e8b1e0c6fca4ec3f7b34cccf55f3f531c659ff4d79
You can use one of your personal transactions or you can select one at random from the mempool.
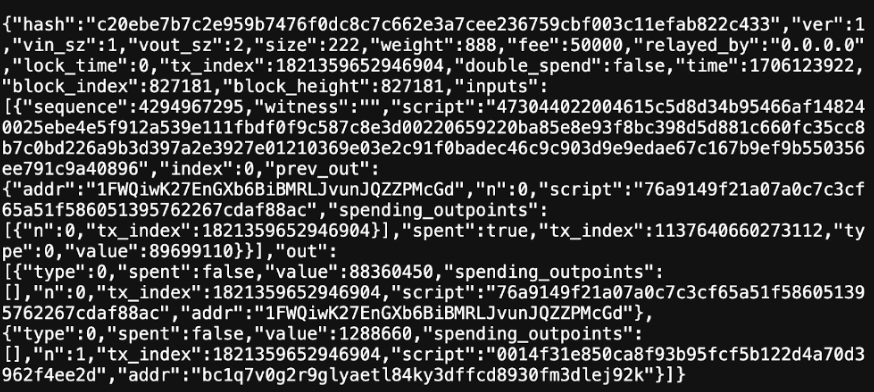
I chose a random transaction from the mempool with TXID/Hash ID: c20ebe7b7c2e959b7476f0dc8c7c662e3a7cee236759cbf003c11efab822c433
Pro Tip – you have to assume that any blockchain explorer, like blockchain.com, is tracking your search queries to your IP address. Using a VPN is always suggested when looking up a specific transaction. This is an example of crypto risks and Bitcoin operational security basics.
Next, paste the Hash ID of a transaction into the search field on BlockChain Explorer. The transaction details will appear and you can verify the Hash ID in the top left corner.

The default ‘overview’, below the Advanced Details shows this is a Pay-to-Public-Key-Hash (P2PKH) transaction even though the recipient’s address was a bech32 native segwit (P2PWH) which will use a witness script, not opcodes like P2PKH, to unlock the pubKey locking script.

‘Overview’ is selected by default, but you should click ‘JSON’ to inspect the code.
You’ll see data in the JSON that isn’t included in the raw transaction detail. pubKeyScript, for example, is the condition that needs to be fulfilled to spend an output. PKscript is omitted from the raw transaction details due to redundancy as the SigScript (public key + signature) satisfies this condition proving you own the private key that was used to derive the public key hash.
Pro Tip: When a new Bitcoin transaction is created, the data is hashed twice, for extra security, with SHA-256 hash function with 64 data scrambling ‘rounds’ (see image below). TXIDs are 64 chars/bytes that represent the 256 bit SHA-256 encryption output called a hash string.
For the purposes of this transaction teardown, we need to get into the ‘raw hex’ view because it’s the easiest way to interpret the data compared with binary or decimal formats.
Computers process binary which is just a string of 1s and 0s. Convert to Hex for readability.
- 0000 (binary) = 0 (hex)
- 1111 (binary) = f (hex)
Next, scroll up to the address bar and copy the URL for this transaction:
How to view the rawtx details for a transaction?
- Copy the URL of the Hash ID you searched.
- Open a new tab and paste the URL but don’t click enter/return.
- Highlight ‘explorer/transactions/btc’ and replace by typing ‘rawtx’
- Click enter/return and your modified URL should return the raw text:
https://blockchain.info/rawtx/c20ebe7b7c2e959b7476f0dc8c7c662e3a7cee236759cbf003c11efab822c433
- Copy this URL > open a new tab and paste the same URL > append ?format=hex to the end of the URL and click enter/return. It should look like this:

- You just converted the Transaction Hash into Hex (Hexadecimal). Ps – there are plenty of tools online you can use for this too like BTCSchools or BlockCypher but I like to do things on my own to max out the learning opportunity.
This may look like a random string of numbers and characters but each grouping represents a key part of the transaction details. (see below)
I’ll explain below how I decoded the long string into each section and what role each plays in the transaction script.
Let’s do this!!
How to Decode a Bitcoin Transaction Raw Bytes
- The first 8 characters specify the Version. 01000000 = Version 1

Transaction Input Raw Hex
- The next 2 chars are the Transaction Count or # of UTXOs used. 01 = 1 Outpoint

- The transaction outpoint references a prior transaction hash ID and index ‘pointing’ to the number of UTXO(s) being spent in this transaction: 20556cdb803ec4889bb3f838a72b356c57d3cd2c91c728243e98630d7aab6e75
- Go back to the Blockchain Explorer page for the transaction and click the ‘JSON’ view. Under ‘Inputs’ there is a referenced (previous) TXID: 756eab7a0d63983e2428c7912ccdd3576c352ba738f8b39b88c43e80db6c5520
We can convert the ‘756…’ from little-endian format to hex here which returns: 20556cdb803ec4889bb3f838a72b356c57d3cd2c91c728243e98630d7aab6e75

- The next 8 characters of the outpoint 00000000 represent the Index which points to the specific UTXO from a previous transaction that is being spent in this transaction. The first UTXO used as an input is referred to as Input 0. Additional inputs, if necessary are referred to sequentially as Input 1, 2, 3 etc.

- The unlocking script (scriptSig) for Input 0 is the ECDSAdigital signature called sig (r value, s value generated from private key) + public key (redeem script) of the sender. When the transaction is being formed, the scriptSig is temporarily filled with the scriptPubKey of the UTXO to redeem until we have the raw transaction data which needs to be SHA-256 hashed 2x then signed w/ private key to create the signature.
- First, we need to figure out the size of the ScriptSig which can be 1-9 bytes. 1 byte = 2 hexadecimal digits.
- Bitcoin uses a VarInt to indicate the length of the ScriptSig field to save space.
- 6a is our VarInt (see below) and is the hexadecimal number representing 106 when converted to decimal. 106 bytes tells us that the next 212 digits (hex characters) represent the unlocking Script Sig (starting w/ 47…96 – see below).

Put your math hat on, it’s about to get wild. Decoding the ScriptSig is confusing.
After the 6a Varint tells us to look at the next 212 chars, there’s more decoding.
- 47, the first byte, is a hex number that is converted to 71 decimal digits.
- 30, the next byte or first two digits (following 47).
- 30 is a marker for DER signature. The next two digits (after 30 marker) are 44.
- 44 hex converts to 68 decimal which tells us the signature is 68 bytes in length or 136 hex digits (68 bytes x 2 = 136 hex since there are 2 hex values per 1 byte)
- 02 is a marker for the r value of the signature and followed by 2 digits (20)
- 20 declares the r value is 32 bytes (64 hex chars) because 20 hex converted to decimal is 32.
- The r value (64 hex digits after the ‘20’) is: 04615c5d8d34b95466af148240025ebe4e5f912a539e111fbdf0f9c587c8e3d0

- Now we need to find the s value of the signature.
- 02 is the marker for the s value and immediately follows the r value.
- 20 declares the s value is 32 bytes (64 hex chars) because 20 hex converted to decimal is 32.
- The s value (64 hex digits after the ‘20’) is: 659220ba85e8e93f8bc398d5d881c660fc35cc8b7c0bd226a9b3d397a2e3927e

- The SHA-256 hash function generates a hash value of 256 bits (32 bytes because 1 byte = 8 bits and 1 byte = 2 hex digits). This value is a 64 digit hexadecimal number.
- The Redeem Script also called the Unlocking Script (ie – scriptSig or witness)
- 01 – Signature Hash (sighash) flag indicates that part of the transaction is signed by the ECDSA (redeem) signature and makes the transaction immutable.
- 01 (SIGHASH_ALL) – signature applies to all inputs and all outputs.
- 03 (SIGHASH_SINGLE): signature applies to all inputs and one output
- 81 (SIGHASH_ANYONECANPAY) + (SIGHASH_ALL): signature applies to one input and all outputs
- 83 (SIGHASH_ANYONECANPAY) + (SIGHASH_SINGLE): signature applies to one input and one output
- 21 – the first byte is a hex number that is converted to 33 decimal digits telling us that redeem script (or public key hash or pubKeyHash) is the next 33 bytes or 66 hex digits: 0369e03e2c91f0badec46c9c903d9e9edae67c167b9ef9b550356ee791c9a40896
- 01 – Signature Hash (sighash) flag indicates that part of the transaction is signed by the ECDSA (redeem) signature and makes the transaction immutable.

- Bitcoin uses a HASH160 algorithm to derive a public key from a private key. The private key is first hashed with SHA-256 then hashed again with RIPEMD160 which generates the pubKeyHash.
Note: If we look back to the 6a, the VarInt told us that the next 106 bytes (212 chars) represented the scriptSig (Signature + pubKeyHash). Let’s add everything up to see if we get 212. Sig r-value (32 bytes – 64 chars) + Sig s-value (32 bytes – 64 chars) + pubKeyHash (33 bytes – 66 chars). 64+64+66=194. 194 + sighashflag (1 byte – 2 chars) + all of the other markers, which are 1 byte/2 chars each (47,30,44,02,20,02,20,21 = 16). 194 + 2 + 16 = 212.
- The Sequence Number (nSequence) follows the pubkeyscript and is disabled by default unless the transaction is Version 2, which would have been declared in the very first field of the transaction raw data. In our example, the nSequence = ffffffff

nSequence field is 4 bytes of data (4b x 2 hex) or 8 hexadecimal digits in little-endian format which tells us if a timelock is enabled or disabled for the transaction (not using replace-by-fee).
- nSequence is the duration of time (in seconds or block height) that the transaction will remain invalid before becoming eligible for validation (nLockTime). nSequence is also used to enable replace-by-fee (RBF).
- FFFFFFFF: opts out of RBF and disables using of nLockTime
- FFFFFFFE: opts out of RBF and allows nLockTime.
- FFFFFFFD: opts in to RBF and allows nLockTime
Pro Tip – if an unconfirmed transaction doesn’t get picked up by a miner due to low fees, you can resubmit the transaction as Version 2 using Replace-By-Fee (RBF) thanks to BIP-0125. RBF w/ LockTime sets 0xFFFFFFFD. RBF disabling LotckTime sets 0xFFFFFFFE.
Hang in there, you’re doing great!

Transaction Outputs make up the final part of the transaction. Transactions must have at least two outputs (spent and change).
Typically, the first output (output 0) is the amount spent/sent to the recipient, though our example transaction lists Output 0 as the change output UTXO as you’ll see when we decode this section. scriptPubKey (aka locking script) is set on each output to prevent anyone from spending the output without the scriptSig (aka unlocking script). Keep reading…
- The Number of Outputs is the first byte in the transaction output (two hexadecimal values). This is a type of VarInt which tells us how many outputs are created and is located following the nSequence and preceding the output value.
- In our example, the VarInt is 02 (hex) which converts to the number 2 in decimal letting us know that two (2) UTXOs are created (see below).

- The next 16 values represent the amount being spent as a hexadecimal formatted in little-endian. First, convert the hex (0246440500000000) as a ‘Hex’ input value to little-endian here which returns the little-endian (hex) value (0000000005444602). Next, convert the little-endian hex (0000000005444602) to decimal here which returns the value (88360450). Convert this to satoshis 0.88360450 BTC.
Nerd Alert: Little-endian is not human friendly to read but computer’s dig it. The numbers that you see in hex are basically grouped in pairs (bytes) and moved from the back of the string to the front (reversed). Use an online hex to little-endian converter or a code library. (see below)
- Output 0 (#1) to address: 1FWQiwK27EnGXb6BiBMRLJvunJQZZPMcGd (P2PKH ‘1’)
- Value of Output 1 (change)
- Hexadecimal: 0246440500000000
- Little-Endian: 0000000005444602
- Decimal Value: 88360450 (0.88360450 BTC)
- Value of Output 1 (change)

Note: At first, I struggled trying to figure out how the raw hex for the amount was parsed to the JSON value that you see on BlockChain Explorer showing the actual amount (in satoshis).
- Conversion Option 1 (fastest): Go here and enter the hex value to return the little-endian number which only requires 1 additional conversion to satoshis (1/100M or 0.00000000 BTC). Hex value: 0246440500000000 -> Little-endian value: 88360450 converts to 0.88360450 BTC)
- Conversion Option 2: Copy/paste the amount hex (0246440500000000) and convert to little endian (0000000005444602). Next, convert the little-endian hex value (0000000005444602) to decimal here (88360450). Convert this to satoshis, 8 decimal points (0.88360450 BTC)
- Conversion Option 3 (slowest): I found that after taking the amount hex (0246440500000000) and converting to decimal (163893224711127040), I could input the decimal value as an ‘Integer’ value to find the little-endian value: 0000000005444602. Next, convert the little-endian hex value (0000000005444602) to decimal here (88360450). Convert this to satoshis, 8 decimal points (0.88360450 BTC)
- Conversion Option 4: Install a python library to convert little-endian to decimal on Github to run this conversion locally on your machine.
- Locking Script: 1976a9149f21a07a0c7c3cf65a51f586051395762267cdaf88ac (52 char) Locking scripts use opcodes to move data on/off the stack
- The locking script (scriptPubKey) is derived from the address receiving the UTXO. WE can break down the locking script for the receiving P2PKH address.
- 19 – convert ‘19’ hex to decimal to get ‘25’. 76a9149f21a07a0c7c3cf65a5
- 76 – ‘opcode’ (OP_PUSHDATA1) pushes the next byte to the top of stack.
- a9 – OP_HASH160 input hashed 2x (SHA-256 then RIPEMD-160)
- 14 – ‘14’ hex converts to ‘20’ decimal and tells us the next 20 bytes (40 chars) is the pubKey Hash: 9f21a07a0c7c3cf65a51f586051395762267cdaf88
- 88 – OP_EQUALVERIFY – runs both OP_EQUAL then OP_VERIFY. OP_EQUAL pops the two top items, compares them, and pushes TRUE if they are the same value else FALSE. OP_VERIFY looks at the result. If FALSE, the transaction terminates.
- ac – OP_CHECKSIG Returns 1 (valid) or 0 (not valid) signature for hash and public key compared w/ a hash of the transaction data including inputs, outputs and signature.
- The locking script (scriptPubKey) is derived from the address receiving the UTXO. WE can break down the locking script for the receiving P2PKH address.

- Output 1 (#2) to (bech32) address: bc1q7v0g2r9glyaetl84ky3dffcd8930fm3dlej92k
- Value of Output 1 (#2) – following 16 hex digits represent the output value.
- Hexadecimal: d4a9130000000000
- Little-Endian: 000000000013a9d4 (convert this hex to decimal)
- Decimal Value: 1288660 (0.01288660 BTC)
- Value of Output 1 (#2) – following 16 hex digits represent the output value.

- Locking Script: 160014f31e850ca8f93b95fcf5b122d4a70d3962f4ee2d
- 16 – convert ‘16’ hex to get ‘22’ bytes. 1 byte = 2 hex digits so this tells us the next 44 values are the pubKeyHash (2 x 22) and is the’ n value’.
- 0014 – hex values to convert to decimal 20 bytes. The following 40 hex digits are the pubKeyHash.
- 0x160014 – P2WPKH (20 bytes)
- 0x220020 – P2WSH (32 bytes)
- pubKeyHash: f31e850ca8f93b95fcf5b122d4a70d3962f4ee2d <data>

Note: This transaction was P2PKH since the sender has a legacy address, starting with ‘1’. The recipient address prefix is ‘bc1’ native segwit which requires less data and does not contain opcodes other than OP_n + <data> to move the data for consensus by the witness is/when this UTXO is spent in the future.
From the example above: OP_16 + <f31e850ca8f93b95fcf5b122d4a70d3962f4ee2d>
- Data Encoding for bech32: bc1q7v0g2r9glyaetl84ky3dffcd8930fm3dlej92k
- bc – Bitcoin Mainnet
- 1 – separator and doesn’t represent a specific value
- q – witness version (q = v0, p = v1)
- 7v0g2r9glyaetl84ky3dffcd8930fm3d – witness program/function
- lej92k – checksum minimum 6 characters prevent an invalid address being deemed valid (less than 1 in 1B chance).
- Note: a bech32 address of the recipient can be decoded from bech32 to binary data in hex. The hex version is what we see in this example’s ‘raw hex’: bc1q7v0g2r9glyaetl84ky3dffcd8930fm3dlej92k converts to -> f31e850ca8f93b95fcf5b122d4a70d3962f4ee2d
- Transaction Fee: This number is not explicitly defined in the transaction raw data.
- The network miner fee = (input amount) – (spend amount + change_amount)
- Calculate Bitcoin transaction fees which can be set automatically, manually, or replaced (RBF) depending on the wallet options or the sender’s designation.
- Locktime (nLockTime): 00000000
- Time locks (aka – Locktime) mark a transaction as ‘invalid’ until an absolute, relative or ‘no’ (immediate) value must be met to become ‘valid’. nLockTime is 4 bytes (4 x 2) or 8 hexadecimal digits in little-endian format.
- A transaction with a lockitme is considered ‘invalid’ until a certain point in the future. Read more and look at examples below:
- No time lock (disabled) is set by a ‘0’ value (00000000 or 0xFFFFFFFF)
- Absolute time locks (nLockTime) sets a specific value in the future as a timestamp or a block height. Block Height is the most common value though miniscript is emerging as a ‘conditional’ solution with practical use cases for (vaulted) cold storage custody and wallet security.
- Relative time locks (nSequence) define the number of blocks (nSequence # x # blocks) or seconds (nSequence # x 512 seconds) that must pass before the transaction is valid.

H2 How Opcodes Work to Run Bitcoin Script
In this transaction e65ad475a01384b086ce0d04199835fdd580739422ece1e0f1c4e362d43735d9:
- 0.89699110 BTC UTXO input
- Spent 0.01288660 BTC
- Received 0.88360450 BTC as change back
- Paid: 0.00050000 BTC in fees
- Transaction Scripting – Validating nodes and miners run Bitcoin Core are programmed to verify Bitcoin transactions with Bitcoin’s Script program.
Step 1: <signature> then <pubkey> pushed to stack.
| Script | Stack | Script to Execute |
| OP_DUP | ||
| OP_HASH160 | ||
| <pubkey hash> | ||
| OP_EQUALVERIFY | <pubkey> | |
| OP_CHECKSIG | <signature> |
Step 2: Top stack item <pubkey> is duplicated with OP_DUP and pushed to top of stack.
| Script | Stack | Script to Execute |
| OP_HASH160 | ||
| <pubkey hash> | <pubkey> | |
| OP_EQUALVERIFY | <pubkey> | |
| OP_CHECKSIG | <signature> | OP_DUP |
Step 3: The top <pubkey> popped off by OP_HASH160 and gets hashed 2x (SHA256 & RIPEMD160). Next, the script <pubkey hash> is added to the top.
| Script | Stack | Script to Execute |
| <pubkey hash> | ||
| <pubkey hash> | ||
| OP_EQUALVERIFY | <pubkey> | |
| OP_CHECKSIG | <signature> | OP_HASH160 |
Step 4: OP_EQUALVERIFY pops both <pubkey hash> items off the stack and compares them to see if hashes are equal. Next OP_CHECKSIG pops <pubkey> and <signature>
| Script | Stack | Script Executed |
| <pubkey> | ||
| <signature> | OP_CHECKSIG |
Step 5: OP_CHECKSIG verifies the signature is valid for the pubkey and pushes a 1 to the stack if marking the transaction as valid and completed.
| Script | Stack | Script Executed |
| 1 |
That’s it. You just earned your Bitcoin Brown belt.
Bookmark this post and use it to decode one of your own Bitcoin transactions.
Note: Stratus does NOT provide investment, legal or tax advice. All information in this article is for educational purposes and should not be interpreted as investment, legal or tax advice. The opinions expressed are those of the author for informational purposes and neither Stratus nor the author are liable for any errors, inaccuracies or omissions. Digital assets, such as cryptocurrencies or decentralized finance, present unique risks for investors. For investment, legal, tax, or other financial guidance you should consult your own advisor.